
By Garry Robinson
Hello Microsoft Access developers and power users,
Hello Microsoft Access developers and power users,
Garry Robinson and in his first article for Database Journal. In case you haven't read his articles before, he used to write for a magazine called Smart Access with Danny Lesandrini, your Database Journal writer since 2004. He has also written Microsoft Access articles for MSDN and He wrote a book on protecting your Access database in 2003. Anyway the main thing you can be assured about is that He is passionate about Access and he hopes he can introduce you to some successful software over the next few months.
In this article, He is going to describe how you can use an Access Database and VBA to manipulate a Web 2 application called Highrise, a customer relationship management (CRM) tool from the highly successful Web2 company, 37Signals. Why pick this online product? The main reason is that I love using it, it has a well-written Application Programming Interface (API) and it is free for your first two hundred contacts. Why might this be relevant and interesting to you, the reader? Because you will be performing these tasks on a database that is hidden behind the security of a website, something that has always been beyond the abilities of Access.
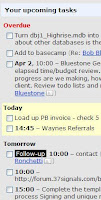
The reason he love Highrise, is that it orders my people specific tasks (e-mailing/calling) into a wonderful list of fuzzy dates comprising today, tomorrow, this week, next week, and later and fuses that with specific dates and times like 12-june-08 4pm (see the sample task list in figure 1). Highrise also keeps track of names, addresses, correspondence relating to people and companies in quite a versatile environment. Anyway, the functionality of the website is not important, what is important is that you can interact with the data in the Highrise website through the API by posting and retrieving XML. This allows you to extend the feature list of the online application and it allows you to merge information on a website with other applications on your desktop. More than likely this is going to be a Microsoft Access database if you are reading this article.
In this article, He is going to describe how you can use an Access Database and VBA to manipulate a Web 2 application called Highrise, a customer relationship management (CRM) tool from the highly successful Web2 company, 37Signals. Why pick this online product? The main reason is that I love using it, it has a well-written Application Programming Interface (API) and it is free for your first two hundred contacts. Why might this be relevant and interesting to you, the reader? Because you will be performing these tasks on a database that is hidden behind the security of a website, something that has always been beyond the abilities of Access.
The reason he love Highrise, is that it orders my people specific tasks (e-mailing/calling) into a wonderful list of fuzzy dates comprising today, tomorrow, this week, next week, and later and fuses that with specific dates and times like 12-june-08 4pm (see the sample task list in figure 1). Highrise also keeps track of names, addresses, correspondence relating to people and companies in quite a versatile environment. Anyway, the functionality of the website is not important, what is important is that you can interact with the data in the Highrise website through the API by posting and retrieving XML. This allows you to extend the feature list of the online application and it allows you to merge information on a website with other applications on your desktop. More than likely this is going to be a Microsoft Access database if you are reading this article.
Note: Other prominent websites that have online API’s include Amazon, FaceBook, SalesForce and Microsoft has a beta release of SQL Server aimed fair and square at this market.
Highrise Website And Download Samples
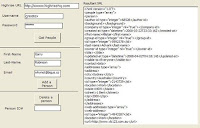
The sample that He set up (shown in figure 2) will get a list of people, will add a person and delete a person. You will find VBA code under the buttons in the download Access database.
Highrise Website And Download Samples
The sample that He set up (shown in figure 2) will get a list of people, will add a person and delete a person. You will find VBA code under the buttons in the download Access database.
To make the sample work, you need to set up your own Highrise website. Do this by heading to http://highrisehq.com/ and clicking on the signup for free link. Work through the signup process until you have a Highrise sub-domain URL of your own plus a username and password. Once you're up and running, add a few people into Highrise as you will need this for your sample.
To use the technology in this sample, you need a copy of a Microsoft library called MSXML. To download MSXML, head to http://www.microsoft.com/downloads/ and search for MSXML6. Now you should be ready to run the samples.
Get a List of People from the Highrise Website into Your Access Application
Let's look at the code that you need to retrieve a list of people. I will do this without including any of the necessary error checking because I want you to see that the code is not all that complex.
Listing 1: Code to retrieve a list of people (without error checking) Private Sub cmdGetPeople_Click()
' Get a list of people from your Highrise account
'Head to (List All) at the following address for full XML
'http://developer.37signals.com/highrise/people.shtml
Dim objSvrHTTP As ServerXMLHTTP
Dim objXML As DOMDocument
Set objSvrHTTP = New ServerXMLHTTP
objSvrHTTP.Open "GET", txtURL & "/people.xml", False, _
CStr(txtUserName), CStr(txtPassword)
objSvrHTTP.setRequestHeader "Accept", "application/xml"
objSvrHTTP.setRequestHeader "Content-Type", "application/xml"
objSvrHTTP.send
'Load Highrise response into an XML document object and
'save it to the harddrive
Set objXML = New DOMDocument
objXML.LoadXML objSvrHTTP.responseText
objXML.Save "c:\highrisePeople.xml"
'If you want better structured XML, use this code
txtXML = objXML.xml
'even though this code is quicker
'txtXML = objSvrHTTP.responseText
Exit_Procedure:
On Error Resume Next
Set objSvrHTTP = Nothing
Set objXML = Nothing
Set objSvrHTTP = Nothing
Exit Sub
End Sub
Let's look at the code in some detail. To start the routine of, you need to declare Dim objSvrHTTP As ServerXMLHTTP
Dim objXML As DOMDocument
ServerXMLHTTP allows you to communicate with the API and DOMDocument gives you a number of code tools to process the XML that is transmitted from the website. Both of these objects come from a well supported library from Microsoft called MSXML (see notes on installing MSXML).
First you need to set up the request that you send to the website to retrieve a list of people. This is managed through the GET command and is wrapped with the website address, user name and password. To make it it more obvious, here is what the GET command might look like for your Highrise subdomain.objSvrHTTP.Open "GET", "http://joessample.highrisehq.com/people.xml ", False, _
"JoeBloogs", "joesmum"
Send Command and Response text
You retrieve data from a website using the “GET” which returns an XML string in the response text of the ServerXMLHTTP object. Now have a look at the following code snippet to see how we populate a text control with the API's XML data. objSvrHTTP.send
txtXML.value = objSvrHTTP.responseText
Working with the good XML
If all is working well, you will now be in a position where you need to do something with the XML that has been returned using the ServerXMLHTTP Send method. Have a look at the XML displayed in the text box on the right hand side of Figure 2. As you can see it is orderly but unlike a table or a query. To do something with the XML (which is text with tags), you can
Use traditional text manipulation functions such as InStr, Left, Mid and Right
Save the XML to a text file and then (try) load that into an Access database using XML import commands that can be found in the Access menus, macros or VBA.
You can manipulate the XML using the DOMDocument object, a tool that will allow you to do almost anything with an XML file if you can work out how to use it.
In this code snippet, I show you how you can save the XML to a text file and display the XML in a text box. Set objXML = New DOMDocument
objXML.LoadXML objSvrHTTP.responseText
objXML.Save "c:\highrisePeople.xml"
'If you want better structured XML, use this code
txtXML = objXML.xml
Tip: if you want to have easy to read XML, use the load XML method of the DOMDocument.
Error handling
There are two types of errors that you can expect when dealing with a Web2 API, status codes from the API and VBA errors. In the download sample you will find the code to handle the website status codes. Whilst the status codes and what they mean will vary from site to site, generally they will work something like this. objSvrHTTP.send
If objSvrHTTP.status = 200 Then
MsgBox "List of first 50 people has been retrieved "
ElseIf objSvrHTTP.status = 401 Then
MsgBox "Listing failed with error# " & objSvrHTTP.status & _
" Check your username and password"
Else
MsgBox "Listing failed with error# " & objSvrHTTP.status & _
" " & objSvrHTTP.statusText
End If
The second type of error that you need to handle is the VBA errors that are generated in this environment. In the following code listing that you will find at the bottom of the download sample, you'll see how a trap an Internet connect error.Error_Handler:
Const NOINTERNETAVAILABLE = -2147012889
Select Case Err.Number
Case NOINTERNETAVAILABLE
MsgBox "Connection to the internet cannot be made or " & _
"highrise website address is wrong", vbCritical, _
"Listing of People cancelled"
Case Else
MsgBox "Error: " & Err.Number & "; Description: " _
& Err.Description, _
vbCritical, "Problem in subroutine called cmdGetPeople"
Resume Exit_Procedure
Resume
End Select
Tip: If you look carefully at the code, you will see that there are two Resume commands together. If you are in Debug mode, you can drag the yellow arrow to the line with only Resume on it. Now press the F8 key and Debug will return you to the line where the error occurred.
Summary ~ it's time to get your head in The Clouds
A lot of the websites are calling this Web2 technology “In the Cloud” software; whilst the name is not important, getting data from “in the cloud” and into your local Access application database is. At the moment, the main stumbling block for Access programmers is that most of the samples online are written in .NET, Ruby, PHP and other Web languages. But rest assured that this is likely to change pretty fast over the next couple of years as more writers start posting samples for VBA on the web. If you read next months article, I will show you a few more tricks. Thanks for reading my first Database Journal article.
MSXML6 is included as part of the Vista operating system so you can be sure you're hooking up with important technology that won't require any setup work in the future.
This in the cloud stuff is really important. At the moment you need to tackle it through MSXML (which is installed as part of Windows Vista) and easy to install for WinXP (if its not there already).
Conclusion ~ XML and MSXML
You are probably going to throw up your hands and say what does XML have to do with Access. To this I say, with XML and MSXML, you can talk directly through port 80 of your computer to the World Wide Web, thereby bringing online Web2 applications and their data to the richest tool on the planet, Microsoft Access.
So find the Web2application that you like, check that it has an API and start talking to the website using MSXML and Access VBA.
This allows you to have just few tables on the web in an online table, a share point list or a Web to website to allow your customers to enter data from somewhere outside of your local network. This can be grabbed from your all singing and dancing Rich Access databases on the local network, alternatively the Rich db can post to the cloud table. What this doesn’t do is make a your whole Access system net ready because coding is a lot trickier with the cloud systems as they bring data down 50 records at a time in XML packets. Not heaps of record like wonderful Access forms.


.gif)


.gif)