from microsoft.com
Applies to
Microsoft Office Word 2003Microsoft Word 2000 and 2002
Addressing a letter to a customer with an umlaut in the name? Comparing U.S. dollars to yen, euros, and pounds sterling in a report? Need to include characters from the Greek alphabet in your science homework? It's amazing how often you need a symbol or international character when you're creating a document.
If you are having trouble finding the symbol or character you are looking for,
tip 1 shows you how to locate characters in the Symbol dialog box, and
tip 2 provides additional information about inserting international characters.
If you have already found the symbol or character you want, these four tricks make adding the symbols or characters you use often even faster.
Tip 3 and
tip 4 show you how to customize Word to open the Symbol dialog box with one click or keyboard shortcut.
Tip 5 and
tip 6 show you how to set up shortcuts for inserting characters or symbols that you use all the time.
Finding the characters and symbols you want
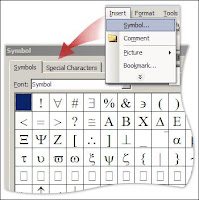
The Symbol dialog box is the place to go when you want to insert a symbol or special character. To open the Symbol dialog box, click Symbol on the Insert menu
With all the symbols and characters available, it can be a challenge to find the one you want. You can change the selection of characters by choosing a different font. You can even narrow your search by choosing a subset of the font.
Tip 1: Try different fonts to see different characters
The Font list in the Symbol dialog box shows the fonts that are available in Word, and each font offers different characters (sometimes very different). Some of the fonts are divided into subsets so that you can view the list of characters by groups. For example, in the Times New Roman font, you can click General Punctuation in the Subset list to quickly view the punctuation characters available in the selected font. Not every font has a Subset list, and the list is different depending on the selected font.
Note To display the Subset list in Word 2003 or 2002 for the fonts that support the list, click Unicode (hex) in the from list at the bottom of the Symbol dialog box.
To find a limited selection of international characters, click the Latin-1 or Latin Extended-A subset in a font that supports the Subset list, such as Arial.
Tip 2: International characters: Use shortcuts or a different keyboard
To insert international characters in your document, you can use a keyboard shortcut, or if you type extensively in another language, you may prefer to switch to a different keyboard.


