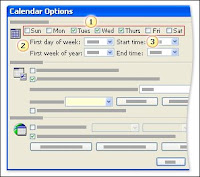
Does your work week start on Tuesday and end on Thursday? Lucky you! You'll be pleased to know that Outlook can display the work week for you that way. You would do this by modifying the settings in the Calendar Options dialog box, as we've shown in the picture. (To open this dialog box, you would click Options on the Tools menu, and then click Calendar Options).
After you modify the settings for the work week, you'll see the Work Week view when you click the Work Week button on the Standard toolbar (note that even if you change the work week to contain some number of days other than 5, the button will continue to display the number 5). In this view, Outlook shows only the days of your work week, and it displays the working hours in a slightly lighter color than the rest of the calendar background. You'll get a chance to try this on your own in the practice session that is coming up next.
If you're using Microsoft Exchange Server, one benefit of setting up your work week to reflect the schedule that you actually work is that when people try to schedule time with you, your Free/Busy time will reflect the appropriate hours and times of your work week. (For more information about Microsoft Exchange, see the article What is an Exchange Server e-mail account?)
